Difference between revisions of "Transferring large quantities of data between institutions"
From Centre for Bioinformatics and Computational Biology
| Line 5: | Line 5: | ||
* You will see two sections: one for each institution | * You will see two sections: one for each institution | ||
* One the left, for the UP bioinformatics Globus Connect server, type fourie#globusconnect at the endpoint link (this is not your login name, it is an endpoint definition that we have created for our UP bioinformatics server) | * One the left, for the UP bioinformatics Globus Connect server, type fourie#globusconnect at the endpoint link (this is not your login name, it is an endpoint definition that we have created for our UP bioinformatics server) | ||
| − | * You will be prompted for your login name and password on the UP bioinformatics server, and will be able to see your files at UP | + | * You will be prompted for your login name and password on the UP bioinformatics server. Underneath the password field, choose Advanced and set a credential lifetime in hours. Once logged in, you will be able to see your files at UP |
* On the right, provide the endpoint for the other institution's Globus endpoint. An example for the CHPC would be CHPC-Globus | * On the right, provide the endpoint for the other institution's Globus endpoint. An example for the CHPC would be CHPC-Globus | ||
* You will be prompted for your login name and password on the other institutions's server, and will be able to see your files once you have logged in | * You will be prompted for your login name and password on the other institutions's server, and will be able to see your files once you have logged in | ||
Revision as of 22:42, 28 September 2021
To transfer large amounts of data between institutions, Globus Connect is the application of choice if supported by both institutions. It is designed to provide a web-based interface where you log in to the servers at both institutions, and perform a large threaded data transfer in the background.
- Create a Globus Connect login at the Globus Connect Site Signup site
- Log in at the Globus Transfer site
- You will see two sections: one for each institution
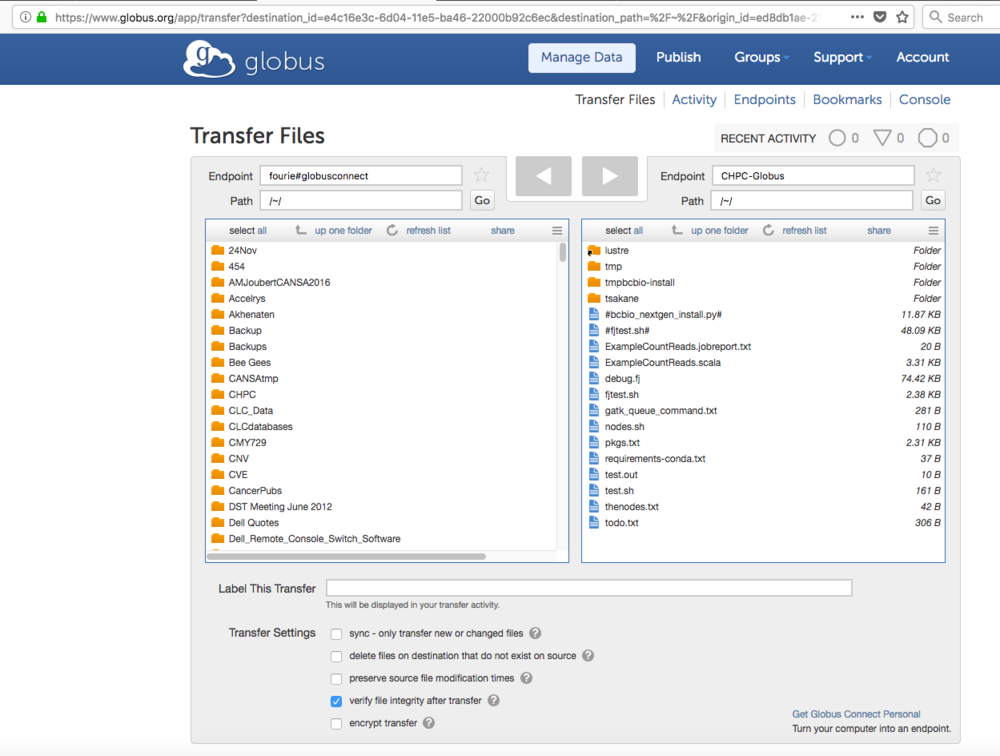
- One the left, for the UP bioinformatics Globus Connect server, type fourie#globusconnect at the endpoint link (this is not your login name, it is an endpoint definition that we have created for our UP bioinformatics server)
- You will be prompted for your login name and password on the UP bioinformatics server. Underneath the password field, choose Advanced and set a credential lifetime in hours. Once logged in, you will be able to see your files at UP
- On the right, provide the endpoint for the other institution's Globus endpoint. An example for the CHPC would be CHPC-Globus
- You will be prompted for your login name and password on the other institutions's server, and will be able to see your files once you have logged in
- An example is shown below:
- You can now perform transfers of files or directories by selecting the item to transfer, and clicking on the arrow key in the relevant direction
- The transfer will run in the background in using an optimized threaded transfer method
- Once your transfer has been initiated, you may leave the site, and will be notified by e-mail when the transfer has been completed
